Scala on Tessel 2

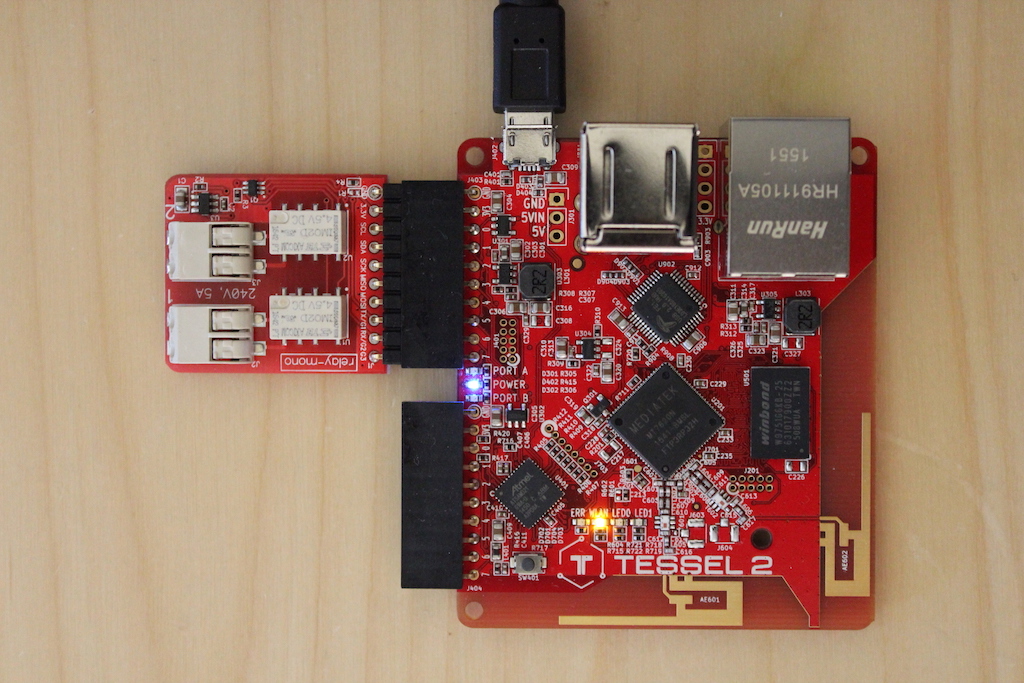
Tessel 2 and its relay module

What is Tessel 2?

Tessel 2 is a Wi-Fi-enabled development board programmable in JavaScript with Node.js. The first units shipped this month. There is a lot that I like about Tessel 2:

  • It is high-level. JavaScript and Node.js greatly lower the barrier of entry since there are so many developers familiar with these technologies.[1]
  • It works out of the box. Take the device, plug it, push some JavaScript, and it does its magic! There is no need to install your own Linux distribution or additional software.
  • It is autonomous. Thanks to its powerful hardware[2], built-in Wi-Fi and Node.js, it runs independently from other computers or even cables (except for power).
  • It is open. The Tessel 2 software and hardware are open source. In fact, Tessel is not even a company but “just a collection of people who find it worthwhile to spend [their] time building towards the Tessel Project mission.”[3]

It short Tessel 2 seems perfect for playing with IoT!

From JavaScript to Scala

As soon as I got my Tessel 2, I followed the tutorial to get a basic hang of it, and that went quite smoothly.

But my plan all along had been to use Scala on Tessel 2. You might know Scala primarily as a server-side language running on the Java VM. But Scala also compiles to JavaScript thanks to Scala.js, and it does it spectacularly well.

So I set to do something simple like toggling relays, but in Scala instead of JavaScript. Here are the rough steps:

  • setup a Scala.js sbt project
  • write an app calling the Tessel LED and relay module APIs
  • run sbt fullOptJs to compile the Scala code to optimized JavaScript
  • run t2 run target/scala-2.11/tessel-scala-opt.js to deploy the resulting JavaScript to Tessel

After I figured out a couple of tweaks (scalaJSOutputWrapper and .tesselinclude), it just worked! Here is the code:

object Demo extends js.JSApp {

  def main(): Unit = {

    println(s"starting with node version ${g.process.version}")

    val tessel    = g.require("tessel")
    val relayMono = g.require("relay-mono")

    val relay = relayMono.use(tessel.port.A)

    relay.on("ready", () ⇒ {
      println("Relay ready!")

      js.timers.setInterval(2.seconds) {
        relay.toggle(1)
      }

      js.timers.setInterval(1.seconds) {
        relay.toggle(2)
      }
    })

    relay.on("latch", (channel: Int, value: Boolean) ⇒ {
        println(s"Latch on relay channel $channel switched to $value")

        if (value)
          tessel.led.selectDynamic((channel + 1).toString).on()
        else
          tessel.led.selectDynamic((channel + 1).toString).off()
    })
  }
}

Notice how I can call Tessel APIs from Scala without much ado.[4] When used this way, Scala.js works like JavaScript: it’s all dynamic.[5]

Types and facades

But a major reason to use Scala instead of JavaScript is to get help from types. So after that initial attempt I wrote some minimal facades[6] for the Tessel and Node APIs I needed. Facades expose typed APIs to Scala, which allows the compiler to check that you are calling the APIs properly, and also gives your text editor a chance to provide autocompletion and suggestions. You can see this in action in IntelliJ:
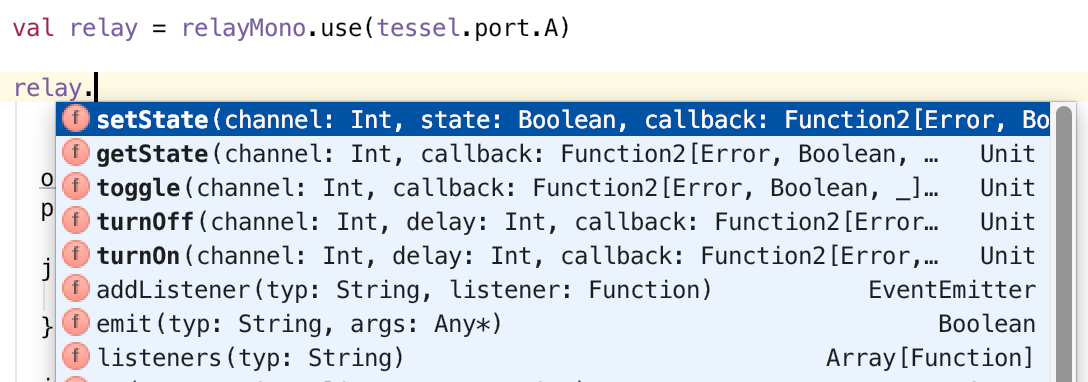
Code completion in IntelliJ

Here are the minimal facades I have so far:

Along the way I realized that working on facades is also a great way to learn APIs in depth! This is the resulting code (which you can find on github):

object Demo extends js.JSApp {

  def main(): Unit = {

    println(s"starting with node version ${g.process.version}")

    val tessel    = Tessel()
    val relayMono = RelayMono()

    val relay = relayMono.use(tessel.port.A)

    relay.onReady {
      println("Relay ready!")

      js.timers.setInterval(2.seconds) {
        relay.toggle(1)
      }

      js.timers.setInterval(1.seconds) {
        relay.toggle(2)
      }
    }

    relay.onLatch { (channel, value) ⇒
        println(s"Latch on relay channel $channel switched to $value")

        if (value)
          tessel.led(channel + 1).on()
        else
          tessel.led(channel + 1).off()
    }
  }
}

As you can see, it’s not very different from the dynamic example, except that I now get help from the editor and compiler.

Why do this, again?

Now you might argue that in both cases the code looks more or less like JavaScript, so why go through the trouble?

It’s true that, superficially, JavaScript and Scala look very similar in these examples. But underneath there is Scala’s type system at work, and this is for me the main reason to want to use that language.

This said, there is more, such as:

  • Immutability by default. I like this because it helps reduce errors and works great with functional programming idioms.
  • Collections. Scala has a very complete collection library, including immutable collections (but you can also use mutable collections).
  • Functional programming. Scala was designed for functional from the get go and has some pretty neat functional programming third-party libraries too.

And I could go on with features like case classes, pattern matching and destructuring, for-comprehensions, and more. But I should also mention a few drawbacks of using Scala instead of JavaScript:

  • Harder language. Scala is a super interesting language, but no matter how you look at it, it is a bigger beast than JavaScript.
  • Executable size. Scala.js has an amazing optimizer which also strips the resulting JavaScript from pretty much any unused bit of code[7]. Still, you will likely have resulting files which are larger than what you would get by writing JavaScript by hand. So expect your app to yield uncompressed JavaScript files in the order of a few hundreds of KB (much smaller when compressed). Tessel doesn’t seem to have any issues with that so far, so it might not be a problem at all, but it’s worth keeping an eye on this as Tessel doesn’t have Gigabytes of RAM.
  • Compilation step. There is a compilation and optimization step in addition to publishing the software to Tessel. For my very simple demo, this takes a couple of seconds only. For larger projects, the time will increase. Now this is very manageable thanks to sbt’s incremental compilation, and if you consider that pushing a project to Tessel can take several seconds anyway, I would say that right now it’s not an issue.

So who would want to program Tessel in Scala? Probably not everybody, but it’s a great option to have if you already know the language or are interested in learning it, especially if you are going to write large amounts of code.

What’s next?

I plan to continue playing with Tessel 2 and Scala. The next step is to try to do something fun (and maybe even useful) beyond blinking LEDs and relays!


  1. This trend is definitely in the air. Read for example Why JavaScript is Good for Embedded Systems.  ↩

  2. Tessel 2 is fairly beefy compared to an Arduino board, for example: it features a 580 MHz CPU, built-in 802.11 b/g/n Wi-Fi, and 64 MB of RAM and 32 MB of Flash. You can add more storage via USB.  ↩

  3. From Code of Conduct/About the Tessel Project/How to Get Your Issue Fixed. It is all the more impressive that they managed to make and ship such cool hardware and software.  ↩

  4. There is one exception, which I had missed in an earlier version of this post, which is access to JavaScript arrays. If you only rely on dynamic calls, you have to cast to js.Array[_], or use the selectDynamic() method. Here I chose the latter way. Things look nicer when you use facades.  ↩

  5. Under the hood, this is thanks to Scala’s Dynamic support.  ↩

  6. Scala.js facades are lot like TypeScript declaration files.  ↩

  7. Also known as DCE for Dead Code Elimination.  ↩

Upgrading Your 17" MacBook Pro Hard Drive

A few days ago I upgraded my MacBook Pro's hard drive after realizing 320 GB drives sell for USD 110 - which made constantly worrying about disk space ridiculous. This also should extend my old MBP's life a little bit.

Here are the steps needed to replace the drive:
  • Buy the new drive ;-) I got mine from Newegg. I picked a 7200 rpm 320 GB drive instead of a 5400 rpm 500 GB drive hoping that performance will be slightly better.
  • Backup your system. I use Time Machine and Time Capsule so that part was easy. Just make sure you don't do any significant work after the last backup.
  • Follow the ifixit instructions to open the laptop and replace the drive. Count about 1 hour to go through this, unless like me you have to run to Home Depot to get one of those funny TORX T6 screwdrivers.
  • Reassemble the laptop.
Now for the software part:
  • Boot on the Leopard install DVD.
  • In the menu, chose Disk Utility. Use that to partition and format the new drive.
  • Make sure the MBP has a way to connect to the network. I connected it by ethernet directly to Time Capsule to shorten the restore time.
  • Restart the machine. I had to do this or the Time Machine restore wouldn't see the new drive.
  • This time choose Restore System from backup. There you pick a source backup. First, you pick your Time Capsule (if that's what you use), then the backup sparse bundle file, and finally the backup version. For the destination, obviously, choose your newly-installed drive.
  • The restore tool then spends a lot of time computing the size of the backup to make sure the data fits in the destination. In my case this took between 30 and 60 minutes.
  • Finally, start the restoration process proper. I let this run overnight so I don't know exactly how long this required, but it took less than 12 hours to restore about 140 GB of data.
Et voilĂ , 174.76 GB of free space! That won't last long...

You may also want to read this excellent post by James Duncan Davidson, with much better photos than the ones I took with my iPhone.

UPDATE: I forgot to mention the following caveats:
  • Time Machine does not backup the spotlight index, so spotlight will run for a while after your first boot with the new drive.
  • The same goes for the Mail.app caches when using IMAP: Mail.app takes quite a while resynchronizing all your email folders.
  • I had rented a movie from iTunes before upgrading. Guess what: that wasn't backed up either, and I had to pay again for the rental as it doesn't appear you can just download the movie again.

A case of failed technology: Bluetooth headphones

I've had a fair experience with Bluetooth devices, including headsets, mice, and keyboards. At home, I am now using the Apple Bluetooth keyboard and mouse, and I am quite happy with them.

Recently, I thought I would look at getting a Bluetooth headphone, especially since the advanced audio profile (A2DP) seems to be getting more widespread, and OS X Leopard finally added support for it. It is just so appealing to go cordless.

So I ordered the Motorola MOTOROKR S9, which had pretty good reviews, and I connected it to my MacBook Pro. Here are the major issues I encountered:
  • Even when no music is playing, there is a constant background noise. If you adjust the volume optimally and play pop music, you may not notice it so much, but this pretty much kills classical music.
  • Interferences, which translate with pops and cracks, come up every few seconds or tens of seconds. I tried distances between the headphone and the computer of maybe two to then feet, with the same result.
  • Background noise and interferences aside, the sound quality is metallic and full of artifacts which remind me of the first mp3 encoders back in the 90s. I guess that this may be due to the use of the low complexity SBC codec instead of decent compression on the wire.
  • Using the headphone or headset along with a Bluetooth mouse simply doesn't work: the mouse will stop to a crawl.
  • I got a complete OS crash (kernel panic) in the OS X A2DP driver. This actually happened after my headset was already shipped back.
The above I think fully justifies my sending the S9 back to Amazon. There are also smaller issues:
  • I got into situations where no sound would come out at all when playing from iTunes, and I simply couldn't get things back to work without pairing the device again.
  • I couldn't get Skype to use the headset microphone as input, but the high-quality A2DP as output.
  • As a headset, the sound only comes out on the left side.
In short I am utterly disappointed because I thought that by now the technology would be ready, and it turns out that there is a lot going on for the S9:
  • It really looks cool and is almost invisible from the front
  • The sound quality of the earbuds themselves seems decent
  • It is comfortable and lightweight
  • As a headset connected to an iPhone, it seemed to work quite well
Hopefully the manufacturers will soon figure out how to really make this work. As it is today, I simply think that it is not useable, certainly not with a Mac.

A paperless life with the Fujitsu ScanSnap scanner

I recently bought two Fujitsu ScanSnap scanners: one for the office (Mac version) and one as a gift for my brother (PC version).

For as long as I can remember, I have had a strong aversion for paper documents. You know, bank statements, invoices to pay, receipts, leases, you name it. Some of these things can be thrown away, but others should be kept for a while just in case. I also have the notion that in this day and age, we shouldn't need to destroy information.

The problem is that paper documents just seem to pile up in a disorganized way unless you make some very serious organization efforts involving old-fashioned hardware like staples, folders, binders, and cardboard boxes. In the end this takes a lot of space and you don't even know where the stuff is. I get goosebumps just thinking about it.

So the obvious solution is to go paperless, which involves scanning those documents which you don't get in electronic form. Going that route with a regular flatbed scanner involves:
  • Placing a sheet on the scanner
  • Going to your scanning software and starting the scan
  • If necessary: turning the page to scan the reverse side
Then repeat until you have scanned all the pages. After that, you may be happy with just plain image files, or you may want to fire your PDF-making software and/or your OCR software. If you are really lucky, things will be smooth enough. But in the end the whole process is just hell for any document with more than one page. I think you have to be somewhat superhuman to consistently go this route. I personally tried and failed.

Enter the ScanSnap:
  • Put your multi-page front and back document in the tray
  • Press the button on the scanner
  • Voila: your PDF file is ready
The ScanSnap is able to scan in duplex, that is front and back (with an option to automatically remove blank pages). It also comes with OCR software which can create searchable PDF documents as an optional (but computationally intensive) step.

It's just amazing how fast you can scan piles of year-old documents with this toy. In fact, scanning actually becomes fun. The hardest task is to name the resulting PDF files and move them into folders (although in theory you could skip this step if you are happy with automatically-generated file names and if you plan to rely 100% on content search).

Amazon Kindle: steps forward, steps backward

Today, Amazon officially announced the Kindle eBook reader and associated services. This has already produced a flurry of blog posts all over the place. The device is not yet available, but it already has 248 customer reviews on Amazon.com (mostly negative so far but again almost nobody actually got their hands on it).

So what did Amazon get right?
  • The Kindle features an "electronic paper" display from E-Ink, the same company that makes the Sony reader screen. This means crisp black text on almost-white-but-kind-of-gray background, 180 degree viewing angle, and ability to read in broad daylight. You can take this on the beach or on your mountain hike, but you will need a reading light in the dark.
  • It doesn't require a PC to synchronize. Instead it uses a Sprint EVDO connection and you buy your books directly from the device. There are no fees for the connection, everything is included when you buy the Kindle.
  • About 80,000 books and magazines are available for download from Amazon.
  • Free wireless access to Wikipedia.
  • Built-in search and dictionary functionality.
On the negative side:
  • As everybody has pointed out, it is a dead-ugly, uncool, device. Compare it with the beautiful second-generation Sony reader. Amazon should really learn from Sony and Apple.
  • If you loose or break the Kindle, USD 400 go down the drain. This today buys you two OLPC XO-1 laptops. I thought that the Sony reader, at USD 300, was already too expensive and beyond what I would pay for such a device.
  • Your only option to get content seems to be through EVDO and Amazon. There is no Wi-Fi or bluetooth transfer. Besides obvious coverage limitations in the US itself, this also means there is no coverage at all outside the US, which alone makes this a poor choice for a device you may want to carry all over the place.
  • Free Wikipedia is better than nothing, but what about the thousands of free books from the Gutenberg project or Creative Commons books?
  • Apparently, you can email Word documents to the Kindle for 10 cents a pop. There is no mention of PDF support, or other open formats so far. But paying for uploading your own documents to your own device sounds quite ridiculous. Even the Sony reader allows you to load PDF and RTF files (although it seems that the result is less than satisfactory for PDF files).
I think that some form of electronic book reader is bound to succeed, and that soon enough paper books and magazines will be largely a thing of the past.

However, I doubt that as is, the Amazon solution will be successful. To succeed, you need a cheap, cool device, and a good degree of openness so that a healthy ecosystem develops.

So far, the electronic book business has followed the same path as the music industry: strong DRM and no sign of openness. We all know the result: after years of painful struggle, DRM for music is being phased out. It seems that instead of learning from this experience, book publishers want to go through the same process instead of embracing the future right away.

Anyway, you may want to read what's Amazon founder Jeff Bezos's take on the whole thing.